It is no surprise that these no-name Honda speakers sound like rattling plastic.. they are almost all plastic and have only tiny magnets. They work fairly well despite their cheap design. However, almost is not good enough for me. They degrade the quality of an otherwise fine car. In comparison, even the dirt-cheap replacement speakers found at Wal-Mart have a robust metal frame and magnet.
There is an additional problem with these no-name speakers in that they don't match standard designs. Instead of evenly-spaced screw holes, there is only one mounting screw and two plastic locking tabs. The mounting holes in the front doors and rear deck are horseshoe shaped. I found no aftermarket speaker that fits. But I was not discouraged, instead I converted these sorry speakers into very good quality Pioneer units. Read on!
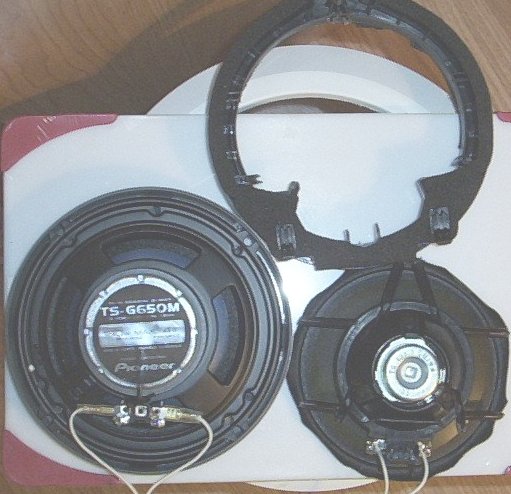
The photo shows the replacement Pioneer speaker, the plastic mounting ring of the Honda speaker, and the cone assembly which has been cut away from the mounting ring. Compare the shape of the mounting ring to that of the standard Pioneer speaker. Note the ring has plastic locking tabs which do not match the evenly-spaced mounting holes of standard speakers. Fortunately, the plastic ring can be hacked to hold the Pioneer speaker such that no modification to your 2006 Honda Civic LX is necessary.
Tools Needed for modification of Honda Speaker:
- small side-cutting pliers
- screwdrivers
- drill for screw guide holes
- utility knife
- glue gun or silicon sealant
- needle-nose pliers
- soldering iron

Hacking Steps
- Remove the foam tape from the speaker front. Do not remove the magnet side foam
- With the sharp utility knife, cut the cone away from the ring
- On the magnet side, use the side-cutting pliers to snip all the plastic struts holding the cone in place.
- Cut the flex material which aligns the cone around the magnet
- Solder the Pioneer speaker wires to the Honda speaker jack
- Cut the jack from the honda speaker cone and discard the cone. Save the magnet for your fridge.
- On the cone side of the ring, cut away the ring surrond material to yield a flat surface.
- On the Pioneer speaker, score the ears of one screw tab with the side cutters, then wiggle them gently with the needle nose so they break off at the score marks
- Position the Pioneer speaker in the Honda ring such that the tab just cut aligns with the big screw hole in the ring
- Now the Pioneer speaker should be evenly centered in the Honda ring.
- Carefully drill a 1/8' guide hole for each of 3 small wood screws
- Screw the Pioneer tabs to the Honda ring
- Seal the unused mounting holes with silicon seal or thermal glue
- There should be no way for air to leak though the speaker frame or support ring

The previous photos used the Pioneer TS-650M which is an older model bought on sale at Best Buy. I installed these in the front door. For the rear deck I used TS-A1671R also purchased at a discount at Future Shop. Here you see it installed in the plastic mounting ring with the jack from the factory Honda speaker soldered and taped. Speakers other than Pioneer may also fit if they have the extension tabs for 6.75" mounting.
Cheap 1-way or 2-way speakers have a compromised design since a single structure cannot work equally well for bass, mid-range, and treble. On the other hand the TS-A167R is coaxial 3-way so that one part does not interfere with the other. This results in clean, full-spectrum response.
This completes Part-1. Coming soon, Part-2 will explain how to remove the factory speakers from the 2006 Honda Civic.